Setting up sync for two AdGuard Home instances (worksheet)
THE TUTORIAL IS MEANT TO BE USED WITH THIS VIDEO!
YouTube tutorials can be a pain to actually follow, so here’s the worksheet that accompanies the video - for your convenience.
I recommend both printing this out, to use as a checklist, and keeping the page up, so you can copy-and-paste the entries.
What you need:
2 instances of AdGuard Home
SSH access to the device running the PRIMARY AdGuard Home instance
AdGuard Home web UI usernames and passwords for both AdGuard Home instances
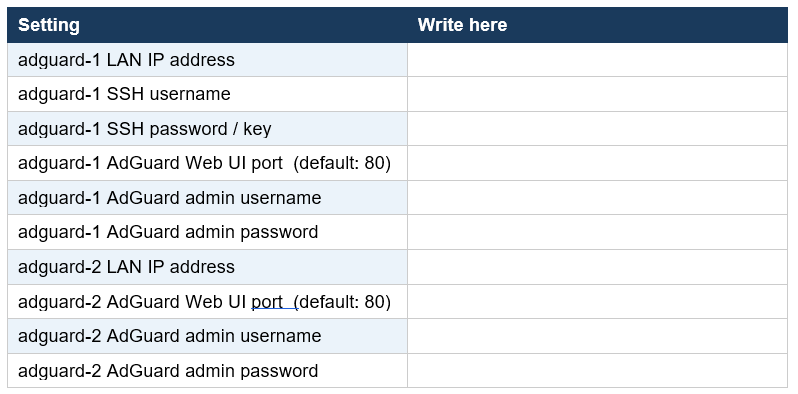
Reference Information
Prerequisites
The primary instance of AdGuard Home is reachable by SSH
AdGuard Home is running on both the primary and secondary instance
AdGuard-1(or whatever your primary instance is called) can reach the internet
You have all of the items in the “Reference Information” section, above
Nomenclature: I will be referring to the primary instance as adguard-1 and the secondary instance as adguard-2.
In my example, adguard-1 has an IP of 192.168.0.13, while adguard-2 has an IP of 192.168.0.14.
The SSH username on adguard-1 is netserv.
Both of my web UIs are running on port 80.
Both of my AdGuard admin usernames are agh.
Both of my AdGuard admin passwords are syncpass.
These values will be different from what you’ve listed in the Reference Information section, and you will need to make substitutions, as needed.
STEP 1 - SSH into adguard-1
Open a terminal on your PC (WIN + R > cmd > Enter in Windows), and connect to adguard-1
ssh netserv@192.168.0.13
replace netserv with your SSH usename, and 192.168.0.13 with your adguard-1 IP address
Enter your password when prompted
STEP 2 - Install Docker on adguard-1
Install Docker by copying and pasting the following command
curl -fsSL https://get.docker.com | sh
Add your user to the docker group so you can run Docker commands without sudo
sudo usermod -aG docker $USER
Log out of the SSH session
exit
Reconnect to SSH with
ssh netserv@192.168.0.13
replace netserv with your SSH usename, and 192.168.0.13 with your adguard-1 IP address
Verify Docker is working
docker --version
STEP 3 - Create the sync config directory
Create a dedicated directory for the sync tool and change into it:
mkdir -p ~/adguard-sync && cd ~/adguard-sync
STEP 4 - Create the sync configuration file
Use nano to create the config file
nano ~/adguard-sync/adguardhome-sync.yaml
Paste the following content, substituting your actual AdGuard IP addresses, usernames and passwords. You may need to add ports to the end of the URLs, if you aren’t using port 80. The configuration includes the first line with the 3 dashes:
---
origin:
  url: http://192.168.0.13
  username: agh
  password: 'syncpass'

replicas:
  - url: http://192.168.0.14
    username: agh
    password: 'syncpass'

# cron schedule — runs every 15 minutes
# use standard 5-field cron syntax
cron: "*/15 * * * *"

# also sync once immediately on container start
runOnStart: true

# Optional REST API port for manual trigger
api:
  port: 8080
Save and exit
Ctrl-X, then Y, then Enter
STEP 5 - Run adguard-sync in a Docker container
Pull the image and start the container with a restart policy so it survives reboots (copy the entire block at once, and execute the whole thing):
docker run -d \
--name adguard-sync \
--restart unless-stopped \
-v ~/adguard-sync/adguardhome-sync.yaml:/config/adguardhome-sync.yaml:ro \
-p 8080:8080 \
lscr.io/linuxserver/adguardhome-sync:latest
NOTE: If something is already on port 8080 (e.g. NextCloud from another tutorial), change the left side of the port mapping: -p 8181:8080
Verify the container started and check the first sync:
docker ps | grep adguard-sync
docker logs adguard-sync
Check for any lines indicating an ERROR or connection refused
STEP 6 - Verify the sync worked
Open adguard-2's web UI in a browser and confirm its settings match adguard-1
Do blocklists match?
Do allow/blocklist entries match?
Do DNS rewrites match?
Do client lists match?
Do general settings match?
STEP 7 - Manual test
Launch 192.168.0.13:8080(except your actual adguard-1 IP, and port from Step 5)
Click Synchronize
Maintenance commands
Run from adguard-1 via SSH:
Check container status
docker ps | grep adguard-sync
View recent sync activity
docker logs --tail 50 adguard-sync
Restart the sync container
docker restart adguard-sync
Update the container image
docker pull lscr.io/linuxserver/adguardhome-sync:latest
docker stop adguard-sync && docker rm adguard-sync
Re-run the docker run command from Step 5
Remove sync entirely
docker stop adguard-sync
docker rm adguard-sync
rm -rf ~/adguard-sync
Architecture summary
Architecture Summary
Router DHCP DNS Servers
DNS1: 192.168.0.13
DNS2: 192.168.0.14
adguard-1 (192.168.0.13) ← primary, config lives here
└── adguard-sync container → pushes config to adguard-2 every 15 minutes
adguard-2 (192.168.0.14) ← replica, independent IP/auth
Both instances filter DNS for your whole network. If adguard-1 goes down, adguard-2 keeps filtering — and vice versa. The sync container only pushes configuration; it is not in the DNS query path.
NOTE: If you have any issues, please comment on the original video for assistance